--

My Blog List

26.3.10

D-D Collab 2

Today was a mighty fine day for metalworking. It was my last day in the shop until April (spring break), so I had extra incentive to get a bunch of work done. I worked on my end of the "collab (oration)" with Daniel so he could work on it next week.

I started out with this sign:
And ended with this piece:Now let me work you through the process.

First, I cut a piece of the "Playground" traffic sign. I then drilled a hole in the center of the sign.

I then used this Jigsaw:
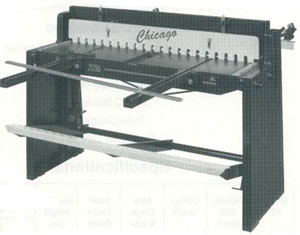
To cut triangle-like shapes into the metal.
After a lot of hammering, struggling and sweating, I was able to bend up these triangle shapes.
I thought about how the piece would hang on the wall, and decided to add a backing. The backing was attached with rivets.
You can start following Daniel's progress on the piece next week at his blog: www.levsart.blogspot.com.

Have a great weekend!

DJ

25.3.10

Chair 1 Upholstering (1), D-D Collab (1)

I'm back with some exciting work to show you.

I accomplished three tasks today. Multi-tasking in the shop takes some skill--mostly thinking on your feet and finding ways to balance new projects with ongoing projects.

1) I bent the traffic sign for Chair 1 to form the seat. The bend is placed where the seat ends and the interior of the knees rest. It provides a smooth transition and a comfortable place for the legs to rest against the front of the chair. I didn't extend the traffic sign to the floor, mostly because it would result in the loss of transparency through the chair, and weigh it down unnecessarily.
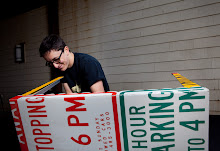
These traffic signs are precious material to me, like rare wood or genuine gold. I try to treat them that way. I felt myself hesitating to bend the sign out of fear that is would destroy its beauty. But I took the necessary precautions, and overcame that fear. I like the result- I hope you do too!
2) I cut two signs that were too wide. I cut them with a large tool so I can cut them appropriately and accurately with smaller tools. Basically, two street signs were 3' 2", and I needed them to be 3' 0" to cut with the step sheer. So I visited the wood shops and asked Mr. Giles Tomson, one of the wood teachers, for his help. He showed me how to cut both signs using the table saw (circular saw on large table), which is a much larger piece of equipment for cutting than we have in the metal shop. It was very successful, considering the table saw is infamous for "kickbacks," when the object you are cutting shoots back at you.

3) I'm starting another side project: a collaboration with my friend Daniel Lev Coleman, a very talented "fine arts" man. We're making a wall piece. I am taking part of the yellow traffic sign and "opening it up" from the center like flower petals opening to reveal a flower bud. Daniel will create a sculpture coming out of the negative space. Here is a concept sketch Daniel sent me:


Comment if you feel strongly about something. Follow the blog if you enjoy the content.

-Deej

22.3.10

Chair 3, Post 2 and Wall Piece 1

Hey All,

As I mentioned in the last post, I'm working on putting traffic signs on the two frames I finished before I make the third and fourth frame. I planned out what signs I need for Chair 1.
Today I cut one of the signs (1) to specification. I need to bend that sign, and I wanted to test how the traffic sign reacted to being bent on a small piece of scrap from the sign. Some signs bend beautifully, but many crack at the seam where they are being bent. This sign cracked. It is a complication I will work out tomorrow.
Misha, Mr.Clifford's daughter, made an appearance in the shops today. Rachel and Gilli were "babysitting" her. They called out my name, and I turned to find Misha trapped underneath Rachel's chair (in progress). It looked like Misha was a little distressed, but apparently she was enjoying it. I had to snap a picture when Rachel suggested it. She's pretty astute about getting onto my blog.

I hit a rut with my main project, so I decided to start a small side project. I took some scrap sign and messed around with it to start this small wall piece. I'm thinking about layering an aqua blue piece of sign behind the yellow that fills the negative space. Hopefully this won't distract me too much from completing the main project.

Let me know what you think, I'd appreciate it greatly. Each comment brightens my day a little!

Best,

DJG


18.3.10

Chair 3, Post 1 and Chronicles of Fashion in the Shops Part 1

Today I started laying out my vision for the third chair of this four chair series. This frame will be three long pieces stacked on top of each other- one will provide the backing, the other two will supply the legs. This is the basic sketch of the profile (side view) of the chair. It is subject to changes, such as an angled back and seat, for comfort purposes.

I like switching things up, so I decided to hold a fashion contest on the blog. It's not really a contest, it's more of a showcase. However, if people want to vote by commenting on this post, we could get a competition going!

Anyways, without further ado, the Lick-Wilmerding High School D Block Fabrications 2 students present:

Chronicles of Fashion in the Shops, Part 1:

Here is Rachel (she continues to make herself known on the blog) sporting a tank-top, cardigan, skirt, sweatpants, and Vans.
Kayla is sporting a frilly looking, fashionable top with a Mexican-infused belt and flowing skirt. Accompanied with sweatpants, for shop safety.
Mr. David Clifford and Mr. Youssou Falls, both very serious and contemplative, wearing long sleeve shirts.
Maddie and Gilli are going for the sophisticated look here, with the sweatpants accentuating the shop-i-ness of the outfits.
Mike is looking somewhat dazed and confused here. Wearing an IN-n-OUT shirt and baby blue sweats. If you haven't noticed from the photos, sweatpants are a staple in the shops for those who enjoy comfortable, dexterity, and fashion-ability. Theo is looking supa-fly with his SkullCandy earphones, white dress shirt, and checkered tie. Checkered is really in right now and Theo knows it. Let's not overlook the "Dead Man" polyester hat, a statement by a true second-semester senior.
Here's Yannick wearing some classy outerwear. As an avid skiier and moutaineer, Yannick knows how to balance comfort and fashion design.
From far away his outfit appears conservative, but take a closer peak and see that Yannick is making a real statement here. "Easy access," he claims. Easy access for pieces of metal to fall through a cut him, that is. Bold and gauche, this look is.
And there you have it for this Fashion Chronicle.

Here are some of my signs, which I will hopefully use to their full potential for the two frames I completed.
Until next time.

Sincerely,

David JG

17.3.10

Chair 2, Post 7

To all those secret followers, make yourself known! Sign up to be a "follower" of my blog. My understanding is that once you "follow," you'll be updated as I post. Also, let your friends know about the blog! I want as many people to check it out as possible, and to leave feedback...


To business-the second frame is finished...!


Tomorrow, my mom is transporting the three signs I have to school. Then I will cut those signs up and rivet them onto the chairs.

In terms of my process for picking the signs, I try visually striking color combination and flexibility of the material to layout which signs go where. Some signs are more easily bent; these signs are thin and are painted with solid colors rather than reflective material. Reflective material cracks when bent, so I only use those types of signs with flat surfaces.

After completing the "upholstery" of the two chairs with signs, I'll take professional looking photos and send them, along with scans of my original design, to design blogs and other publications to attract attention to my project, this blog, and my work in general.

And then, of course, I will continue to trek towards my goal of four chairs.

Yours,

D

16.3.10

Chair 2, Post 7


Today was pretty straightforward: I cleaned up the frame of its welds using a grinder and shined the surface lightly with ScotchBrite hand pads.

In other news, I now have enough signs to upholster at least these two chairs. I have this picture handy of the 8' by 4' Airport Sign. I got it cut in half to 4' by 4' so I can cut it more easily using the Step Shear and the Bansaw.
Right now I'm thinking of painting the frame of the second chair, mostly to disguise the welds and scratches at the surface of the metal. What do you think?

-DJG

11.3.10

Chair 2, Post 6

What a way to end the week. My second frame is all welded together, and now all I need to do is finish it with fine detailing. But the chair is strong, sits on all four legs without rocking, and looks attractive (for the most part). It wasn't that way yesterday. I didn't weld the frame completely, and left only small welds as I cleaned up some of the welds. Well, I learned my lesson. The two sides of the frame fell apart:
I had to return to make the replace those broken welds, and now everything's in order.

The greatest news of all is...I now have an 8' by 2' traffic sign. Pictures will be posted soon, but it's pretty sweet!

Have a good weekend.

DJ


8.3.10

Chair 2, Post 5

Chair 2 is nearing completion. Today I "leveled" the legs of the chair. This entailed fine tuning the four points that touch the floor so they touch the floor evenly. I still have work to do in this area, to say the least. I placed the chair on a flat surface after welding the two sides of the frame together. Three of the legs came down perfectly, but the fourth was about 1/8 inch off the ground! I'll post my solution tomorrow.


I noticed again that the 16" height of this chair looks rather short. It's almost like it's made for a small person. To test the ergonomics (the comfort level and how it will fit my body when it's finished) I slapped on two pieces of wood with clamps and sat in it. Quite frankly, it's really damn comfortable. Here's a picture of me in it, thanks to Rachel. I have on my TIG welding getup.

On another note, this weekend I participated in David Marks' gilding and patination class in Santa Rosa. Besides the hour drive to get out there, it was rather fun and instructional. David is a master craftsman with the Baulines Crafts Guild, an organization that contacted me a while back and that I'm finally getting involved with. Here are some images of my work there. It was a completely new experience for me, so I was experimenting-with varying levels of success. You can expect that I will experiment with some of these techniques on some of my work in the future!
Finally, I'd like to thank Yubi and Marianela for commenting on recent posts. Your feedback and comments are accepted enthusiastically!

Cheers,

David

4.3.10

Chair 2, Post 4

Today was awesome. I got quite a bit done, solved quite a few problems, and am much closer to finishing the frame of my second chair.
I "tack" welded (small weld to hold pieces together) the 3rd and final piece of the frame (x2). This wasn't as easy as I thought it'd be. I measured the length of one of the pieces incorrectly, and had this huge gap I needed to weld together.

So I set it up and tried to MIG weld a huge "weld bridge" across the gap. Suffice to say it didn't work; the metal caved in and I was left with a larger hole than I started with.


As I was scratching my head, my metal instructor dropped by. He laughed and said "Good luck with that!" Not what I wanted to hear at that moment of vulnerability, but he did offer a solution I had thought of before but didn't use: put a small piece to further bridge the two pieces.

This solution worked, as seen below. With some grinding and precise cleaning, this large mountain of metal will clean up rather nicely.


I am somewhat disillusioned about the actual quality and "value" of this prototype though (like if I was to sell it and donate the money to a non-profit cause). The welding, since I'm trying out the MIG welder for the first time, will be mediocre. The design is also being worked out in the process, so I'm not sure how similar the final chair will be to the one I originally set up to make.

This is my idea: make four prototypes (which exempts them from perfection) and pitch those chair ideas. The best chair (from ergonomics to form), I could remake with more precision, as a craftsman would (to the best of my ability, with more attention paid to detail rather than overall look). Thoughts on this idea? If I continue at this rate, I will be able to pull off four prototypes and one "masterpiece," we shall call it!

Please comment on posts you enjoy or dislike, and send me feedback at djosephgoteiner@gmail.com!

Best,

David

3.3.10

Chair 2, Post 3

Hello there. Today, I spent more time learning the techniques of TIG welding. I felt comfortable enough with it to weld two four pieces together for my second chair. However, I encountered problems.

Simple mistakes like: turning the gas off (the gas is crucial to making a correct weld) and forgetting to turn it back on, not completely removing a fried part of my tungsten tip (which conducts electricity, essential for heating the metal correctly).
In addition to those problems (which I can fix using a MIG welder, which makes heavier and less precise welds), I found that the two sides of my frame aren't exactly identical. A sixteen of an inch too long one place, an eighth of an inch to short another place--these errors add time and problem solving to the process of creating the chair. The good thing is, I'm learning from these mistakes. I'll mention it again for those who didn't read my introduction to the blog-one my outcomes for this blog is to reflect on my process of chair making and to gain insight into how I can improve my process.

Documenting my mistakes here is more important to me than seeming like an experienced metalworker. I'm not experienced; I'm an amateur. This blog will help me become more experienced, if anything.

I did have some success TIG welding though- when I was setup correctly, I hit all the welds with accuracy and consistency!
I'll also concede that I almost quit working today. After a few successful welds, I hit a rough patch; I kept messing up, and I was confused about what I was doing incorrectly. My teacher helped me, and I resumed work, but I was foiled again. I hesitated at that moment- I just wanted to clean up and leave the shops to get my composure back. But I thought, "Why? Aren't you going to do this work tomorrow anyways? Get over yourself, and get back to work."

Ultimately I solved the problem and made good progress. If I left the shops as I wanted to, I wouldn't have had such a successful day. That was very satisfying- to know that I could overcome internal pressure to give up and prove myself capable of recovering from a frustrating situation.